The Fold and Unroll Plugin in BeeGraphy lets you turn 3D shapes into flat cut-and-fold nets, ready for a laser cutter, CNC knife or plotter. Instead of unfolding a model by hand, the plugin flattens it for you, numbers every joint so the pieces are easy to match up, and lets you fold the net back into 3D to check it before anything is cut.
The plugin is commonly used to make lampshades, pendant lamps, boxes, packaging, faceted domes, canopies, cladding panels and papercraft models. Flat faces come out whole, curved faces come out as flat triangles that bend smoothly, and doubly curved shapes such as domes and bell lamps are cut into strips (gores) that are never stretched, because sheet material can bend but not stretch. You can add glue tabs in any shape you draw, choose how many tabs each strip gets, and get smooth cut lines for clean machine output. Because everything happens inside the node graph, the net updates every time the shape or a slider changes.
What makes the Fold and Unroll Plugin particularly powerful is that it closes the loop between the 3D model and the flat sheet in a single environment. It removes the need for separate unfolding software and guesswork: you design the shape, get the cut file, and confirm with a fold-back check that every piece fits, all in one connected workflow.
The plugin has four nodes: Unroll Surface, Triangle-Strip Unroll, Fold Back Check and Refold Net.
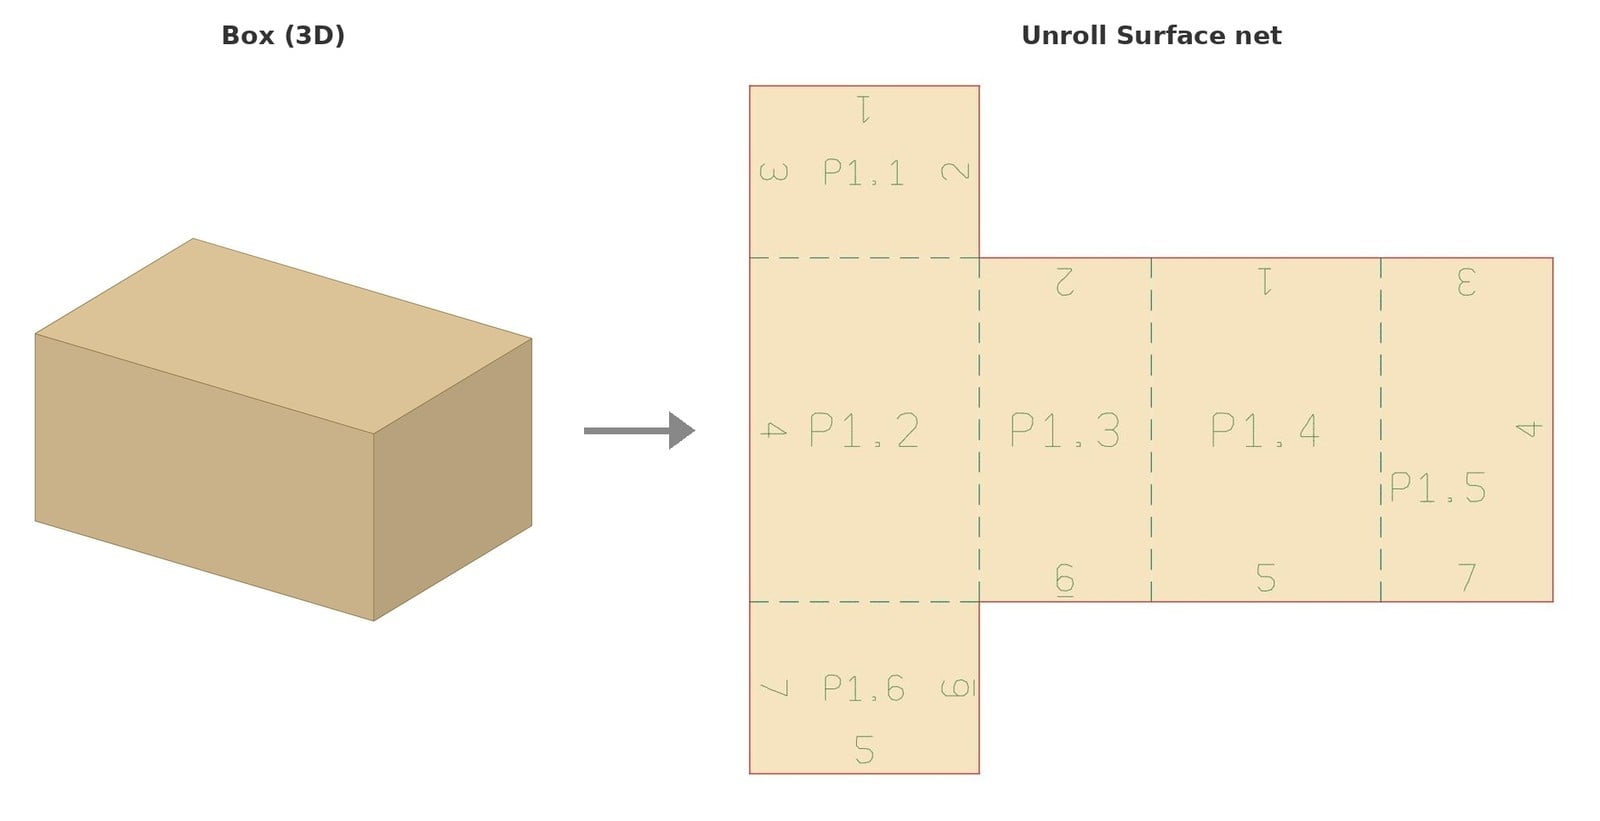
The Unroll Surface node flattens a Solid or Surface into a numbered cut-and-fold net laid out on the XY plane. Planar faces unroll whole, single-curved faces (cylinders, cones) unroll as flat triangles that bend smoothly into each other, and doubly curved faces (spheres, domes, a revolved lamp) are cut into strips that unroll exactly. Every joint gets the same number on both edges, and every piece gets a name (P1, P2 …), so assembly is straightforward. It is the node to use for most nets.
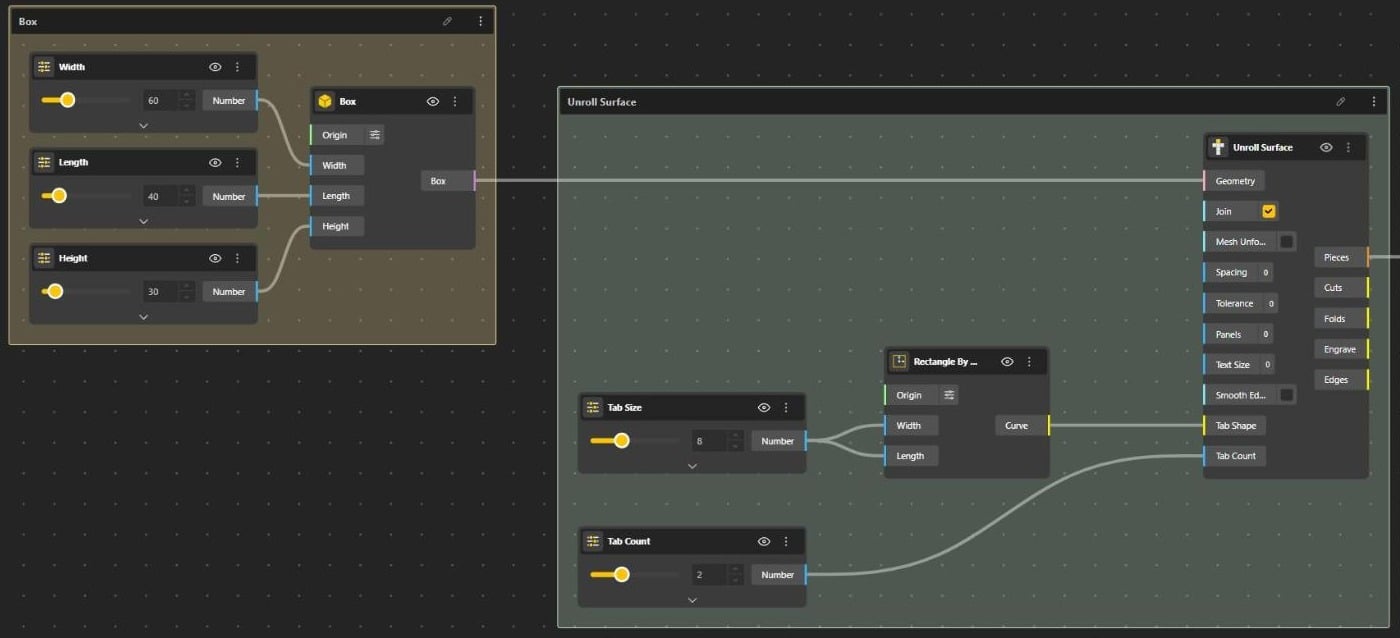
To use it, wire your shape into Geometry. With every setting left at its default you get a complete net next to the shape.
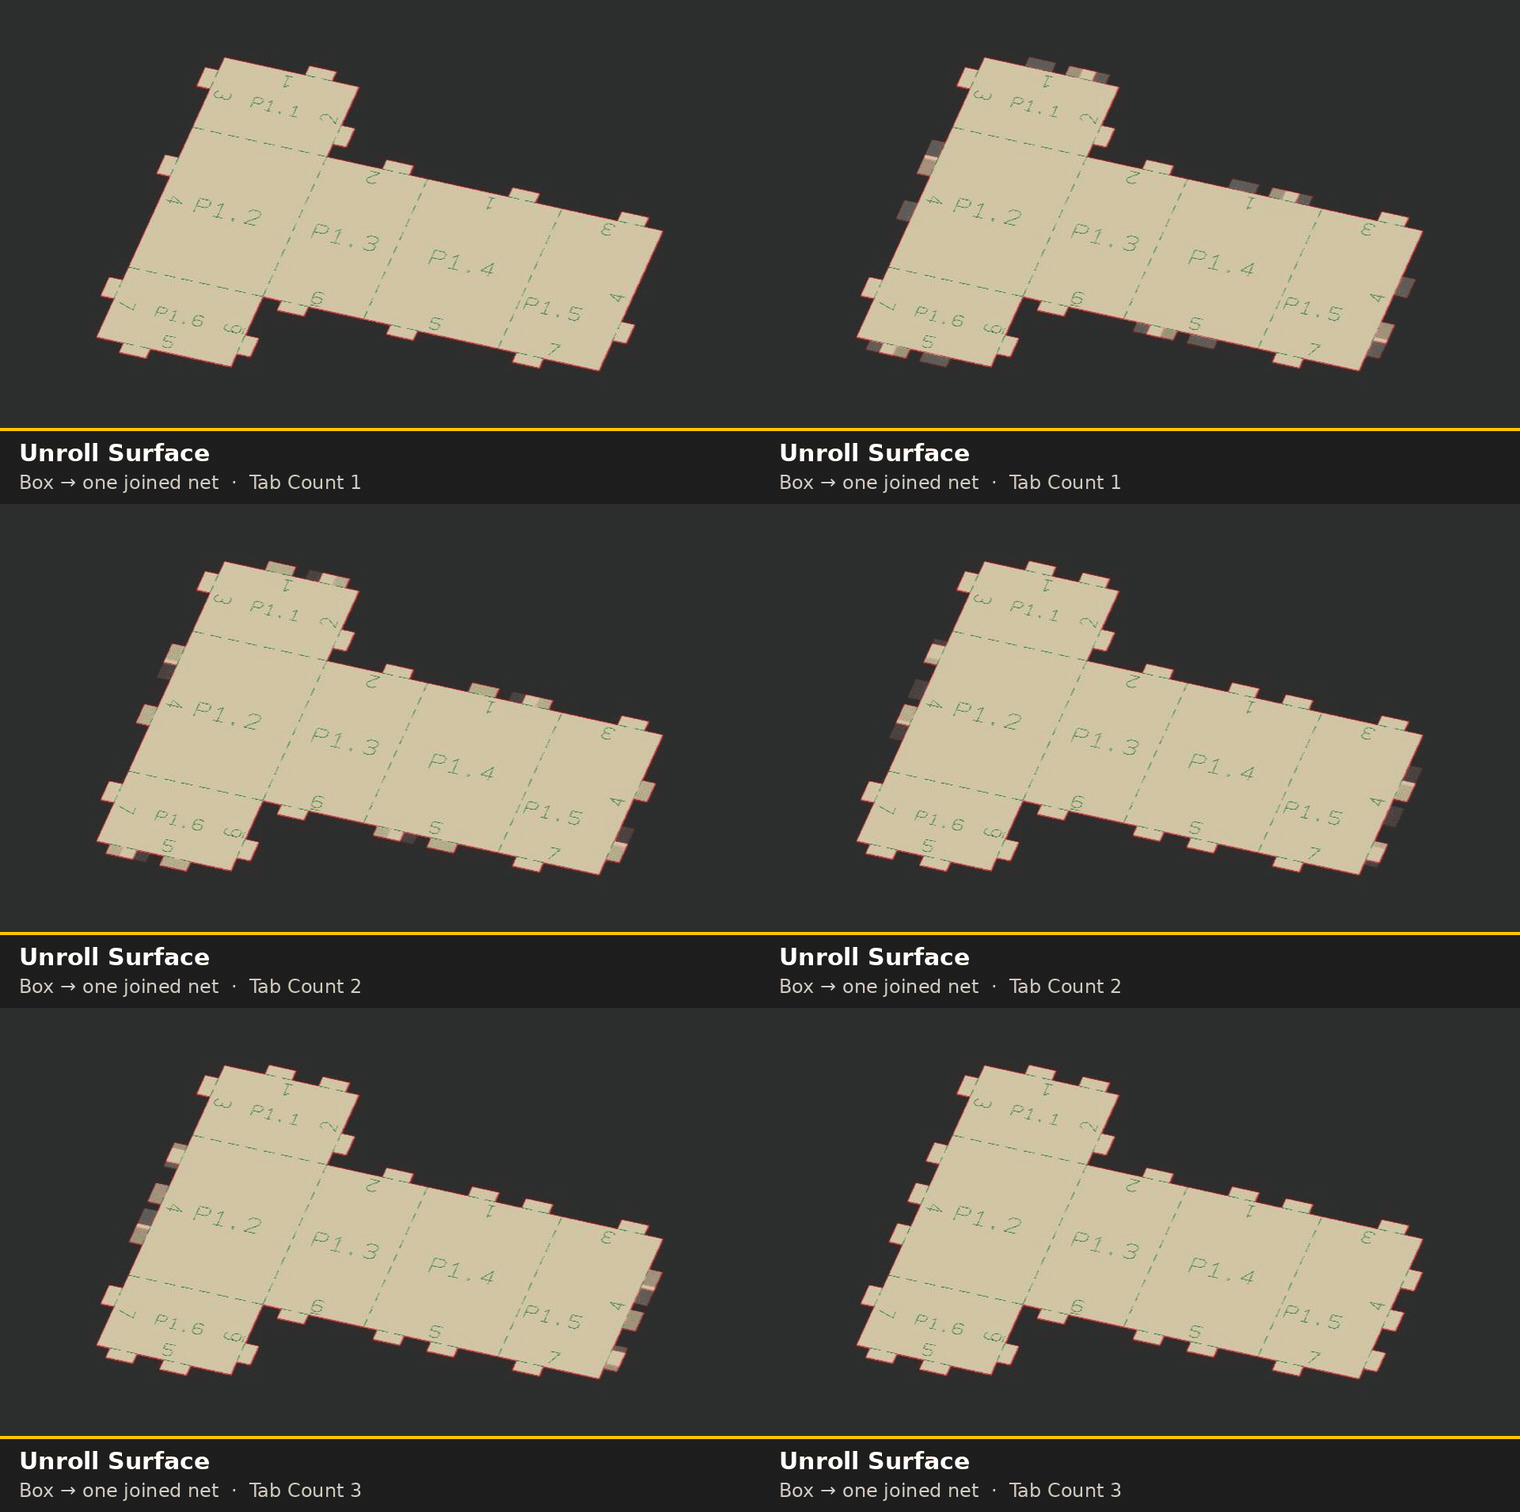
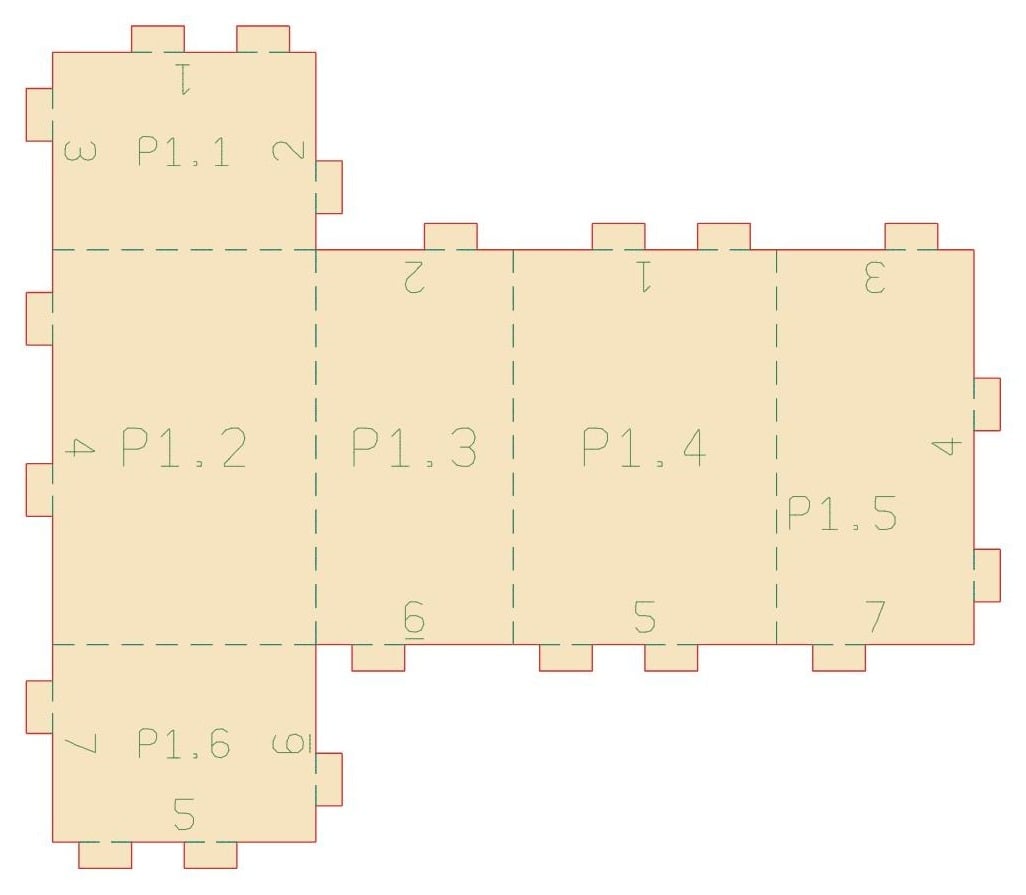
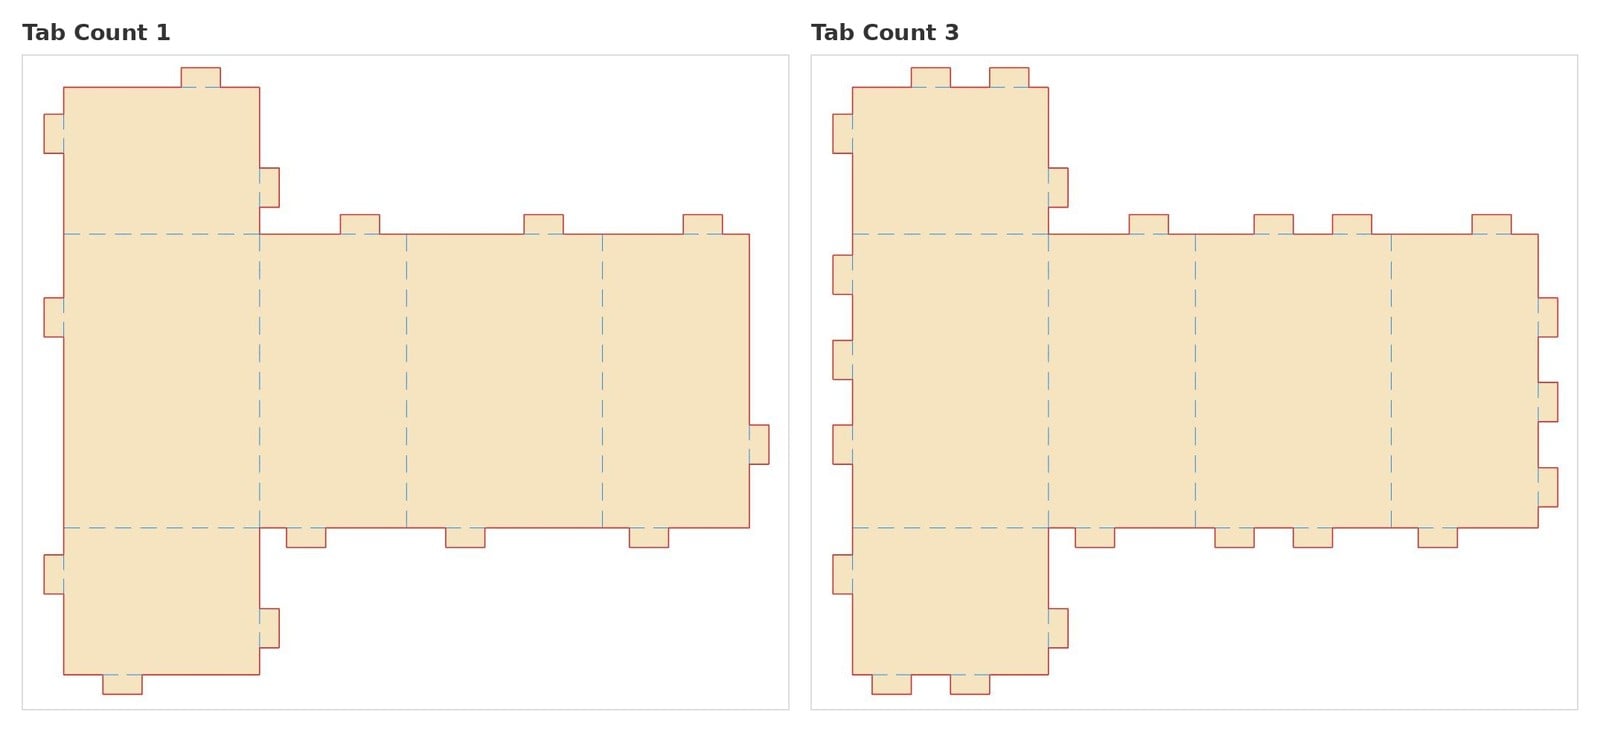
In the viewer: raising Tab Count adds more glue tabs along every seam of the box net.
Join: keeps pieces joined along their fold lines, so a box comes out as one net. Turn it off to get every face as a separate piece. Join cannot keep a sphere or torus in one piece: see Curved Surfaces below.
Mesh Unfold: unfolds the part as a papercraft mesh instead (see below).
Spacing: the gap between laid-out pieces. 0 = automatic (5 % of the largest piece).
Tolerance: how close two corners must be to count as one point. 0 = automatic, relative to the part size.
Panels: how many strips a doubly curved face is cut into. 0 = automatic from the curvature. More strips follow the shape more closely but add more seams.
Text Size: height of the engraved joint numbers. 0 = fitted to each edge.
Smooth Edges: draws curved cut lines as one smooth curve instead of many short straight segments, so strip edges have no small kinks. Turn it on for laser or CNC output.
Tab Shape: wire any curve (a Circle, an Arc, a Polyline) to add glue tabs in that shape (see below).
Tab Count: how many tabs each edge of a seam gets. 0 = as many as fit.
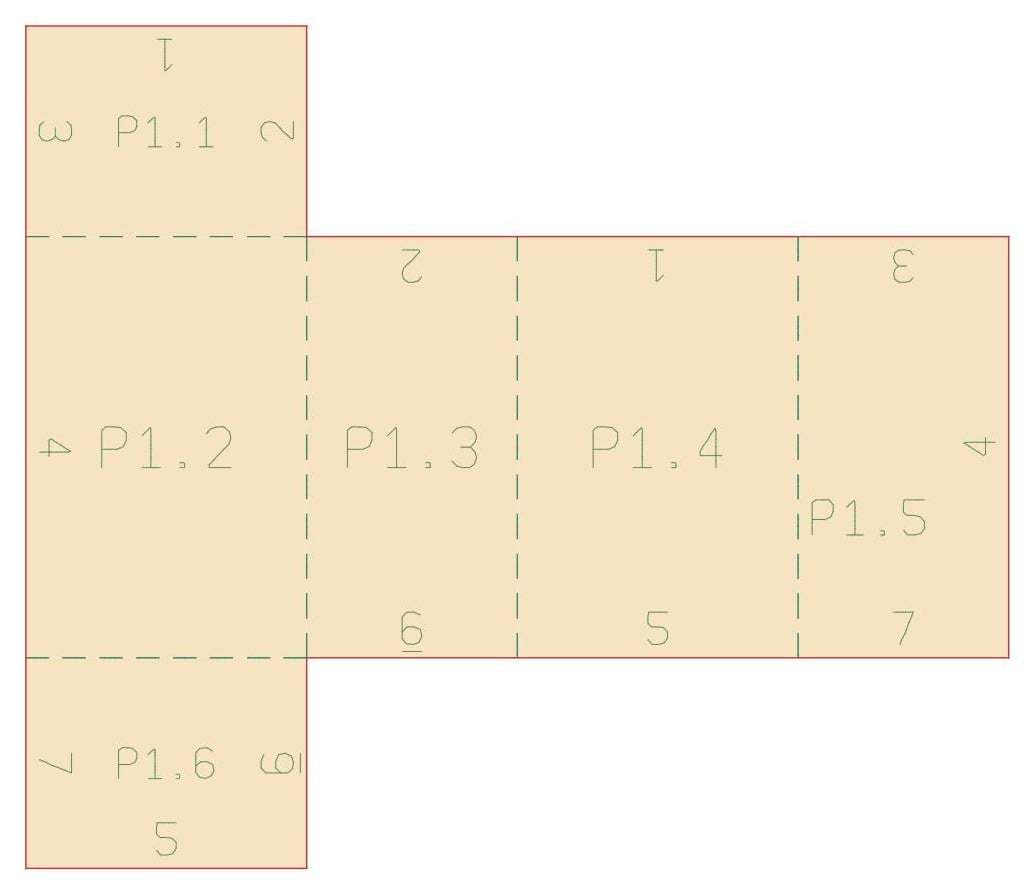
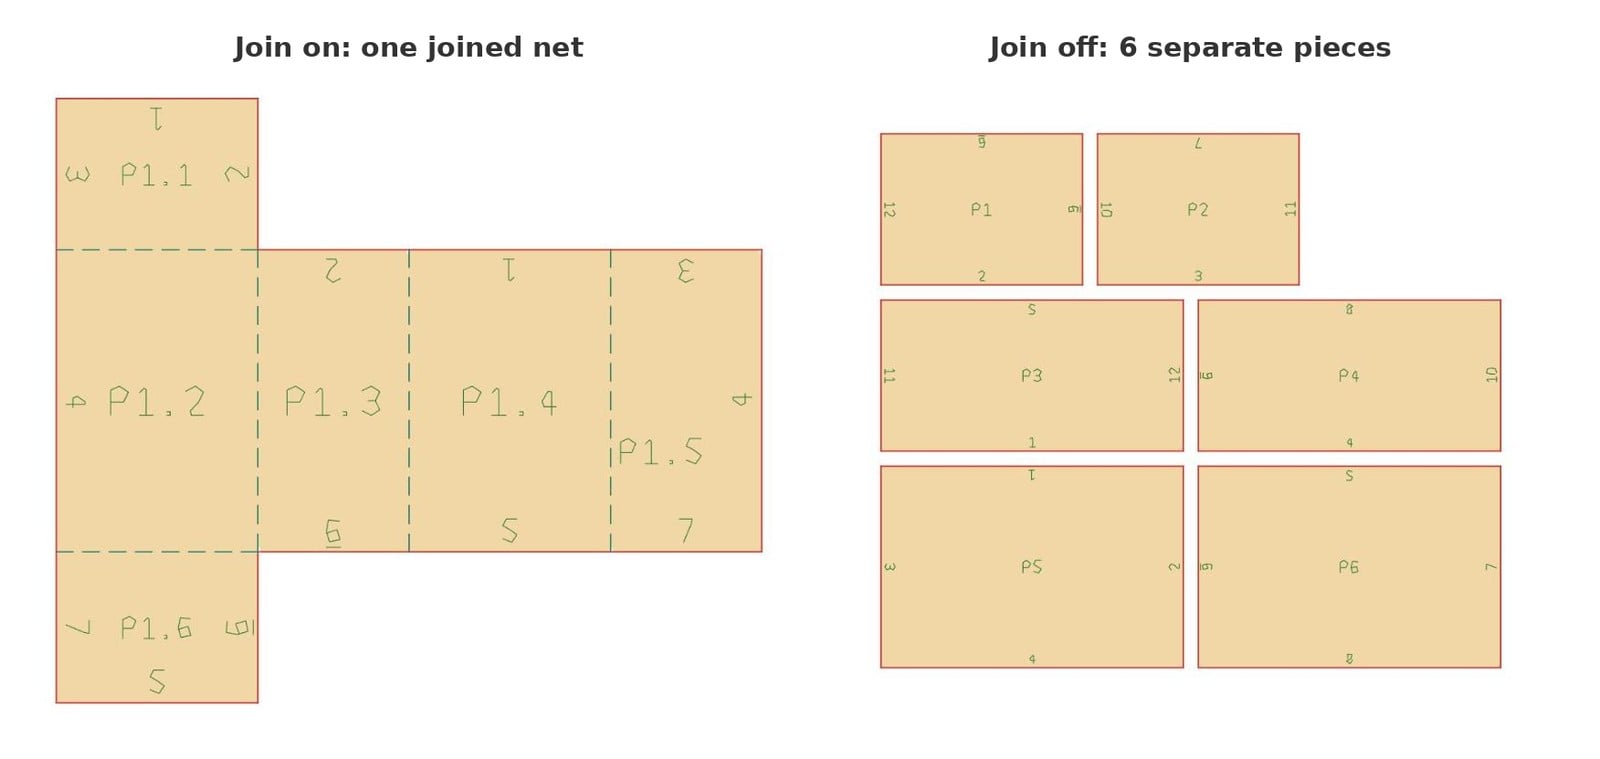
Join on (the default) keeps faces that share a fold line in one piece, so a box comes out as a single net. The faces are named P1.1, P1.2 … (piece 1, face 1, 2 …), the folds between them are dashed, and only the outside edges are cut and numbered (1 to 7 for a box).
Join off cuts every face out as its own piece (P1 to P6 for a box). There are no fold lines: every edge is a cut, and each edge of the shape gets a number that appears on both faces it joins (1 to 12 for a box). Use it when each face is cut from a separate sheet, or when small separate parts nest better on the sheet than one big net.
A pyramid behaves the same way: one star-shaped net with Join on, five separate faces with Join off.
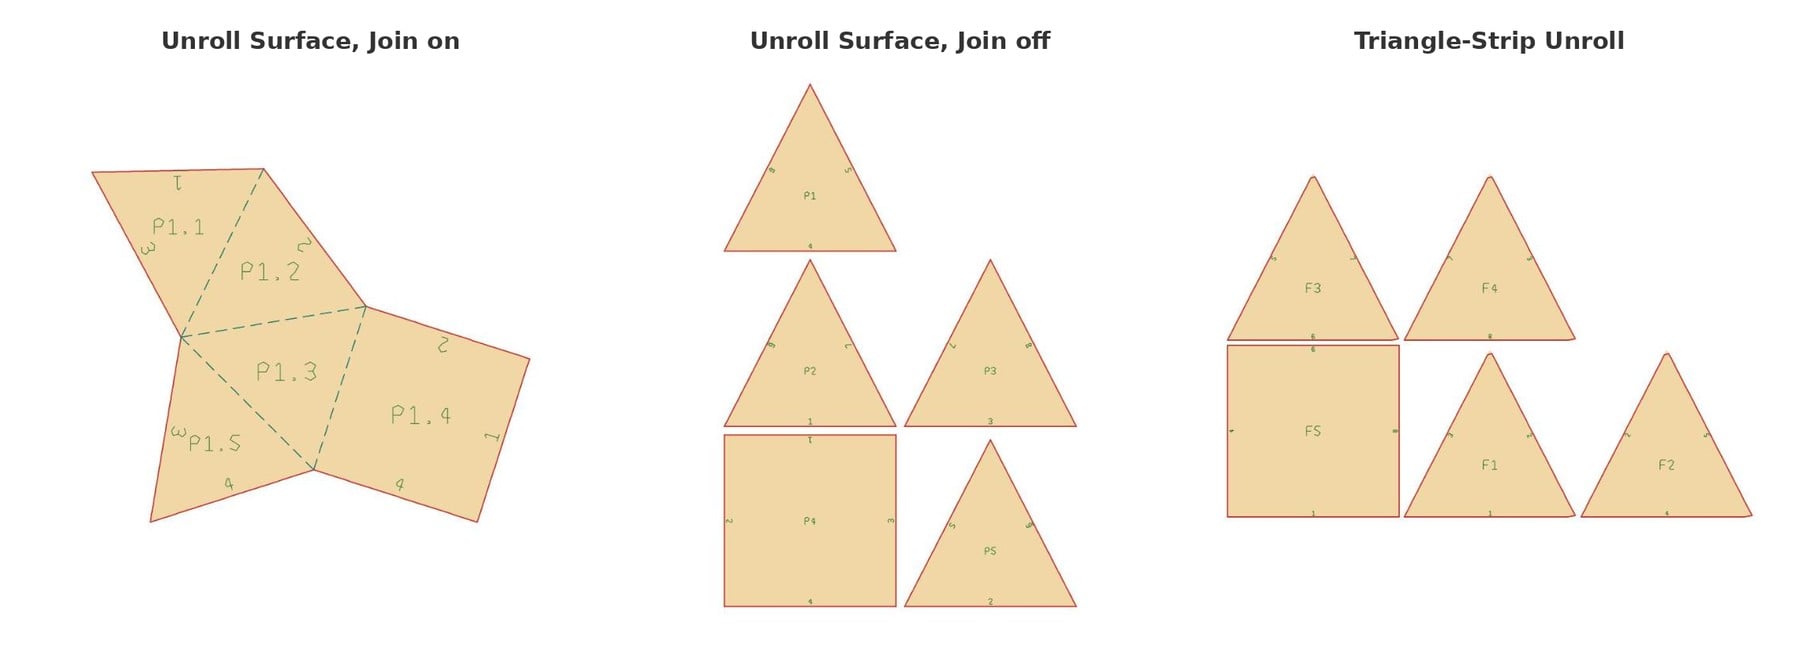
Join in Triangle-Strip Unroll. Triangle-Strip Unroll has no Join setting, because what stays joined is fixed by how it works:
Always joined: the triangles inside one strip. They stay connected along dashed fold lines, so each strip folds up facet by facet.
Always separate: each strip (A1, A2 …) and each flat face or cap (F1, F2 …). They are held together only by matching seam numbers and glue tabs.
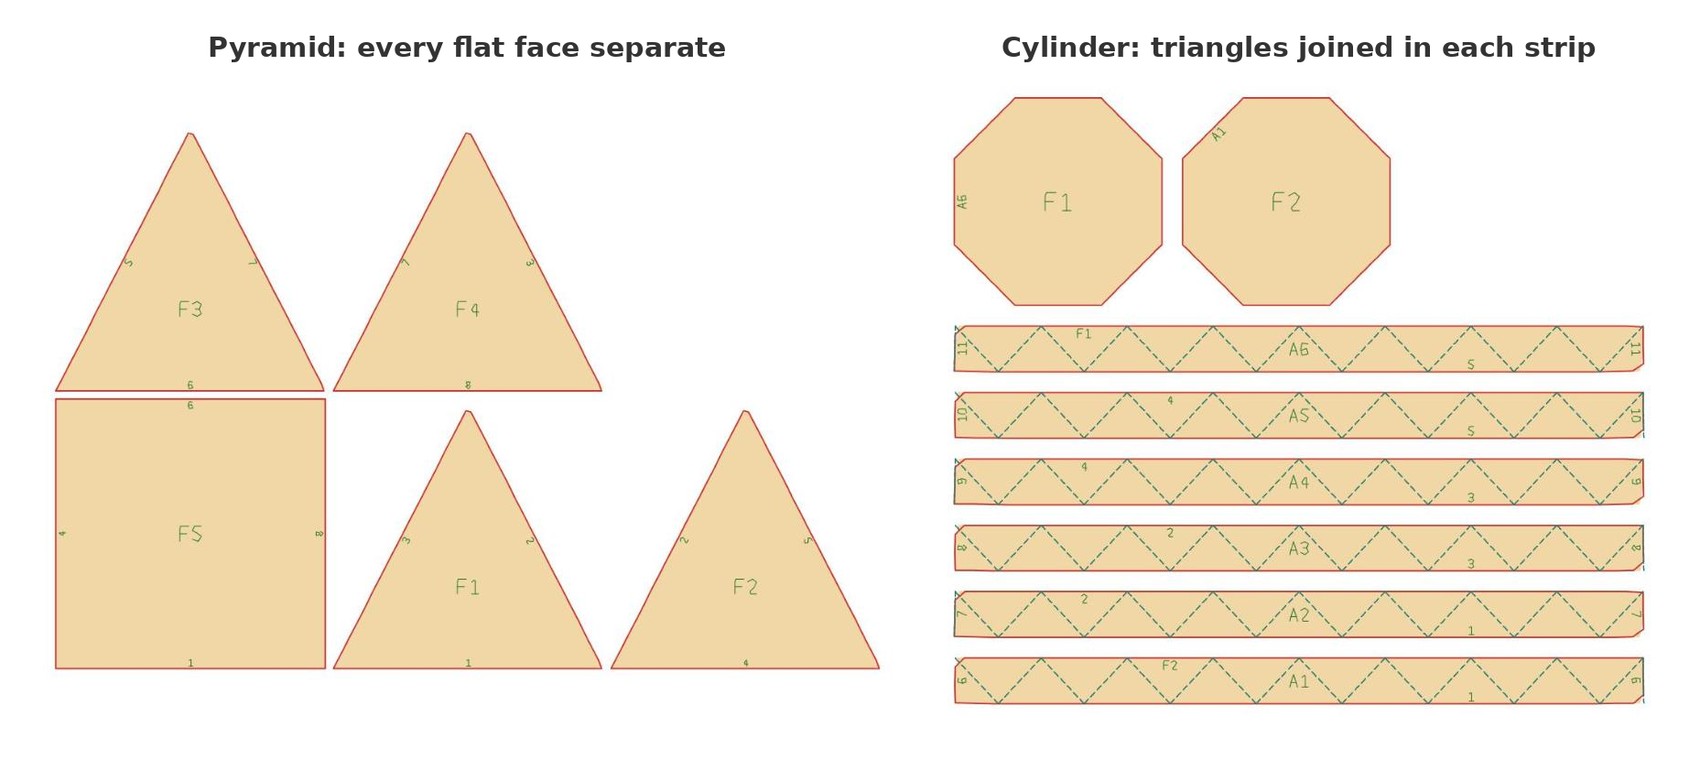
On a shape with only flat faces, like the pyramid above, there are no strips, so every face comes out on its own, the same as Unroll Surface with Join off. On a curved face, like the side of a cylinder, you get strips of joined triangles plus separate caps.
Pieces: the flat pieces as surfaces. Wire them into Fold Back Check or Refold Net.
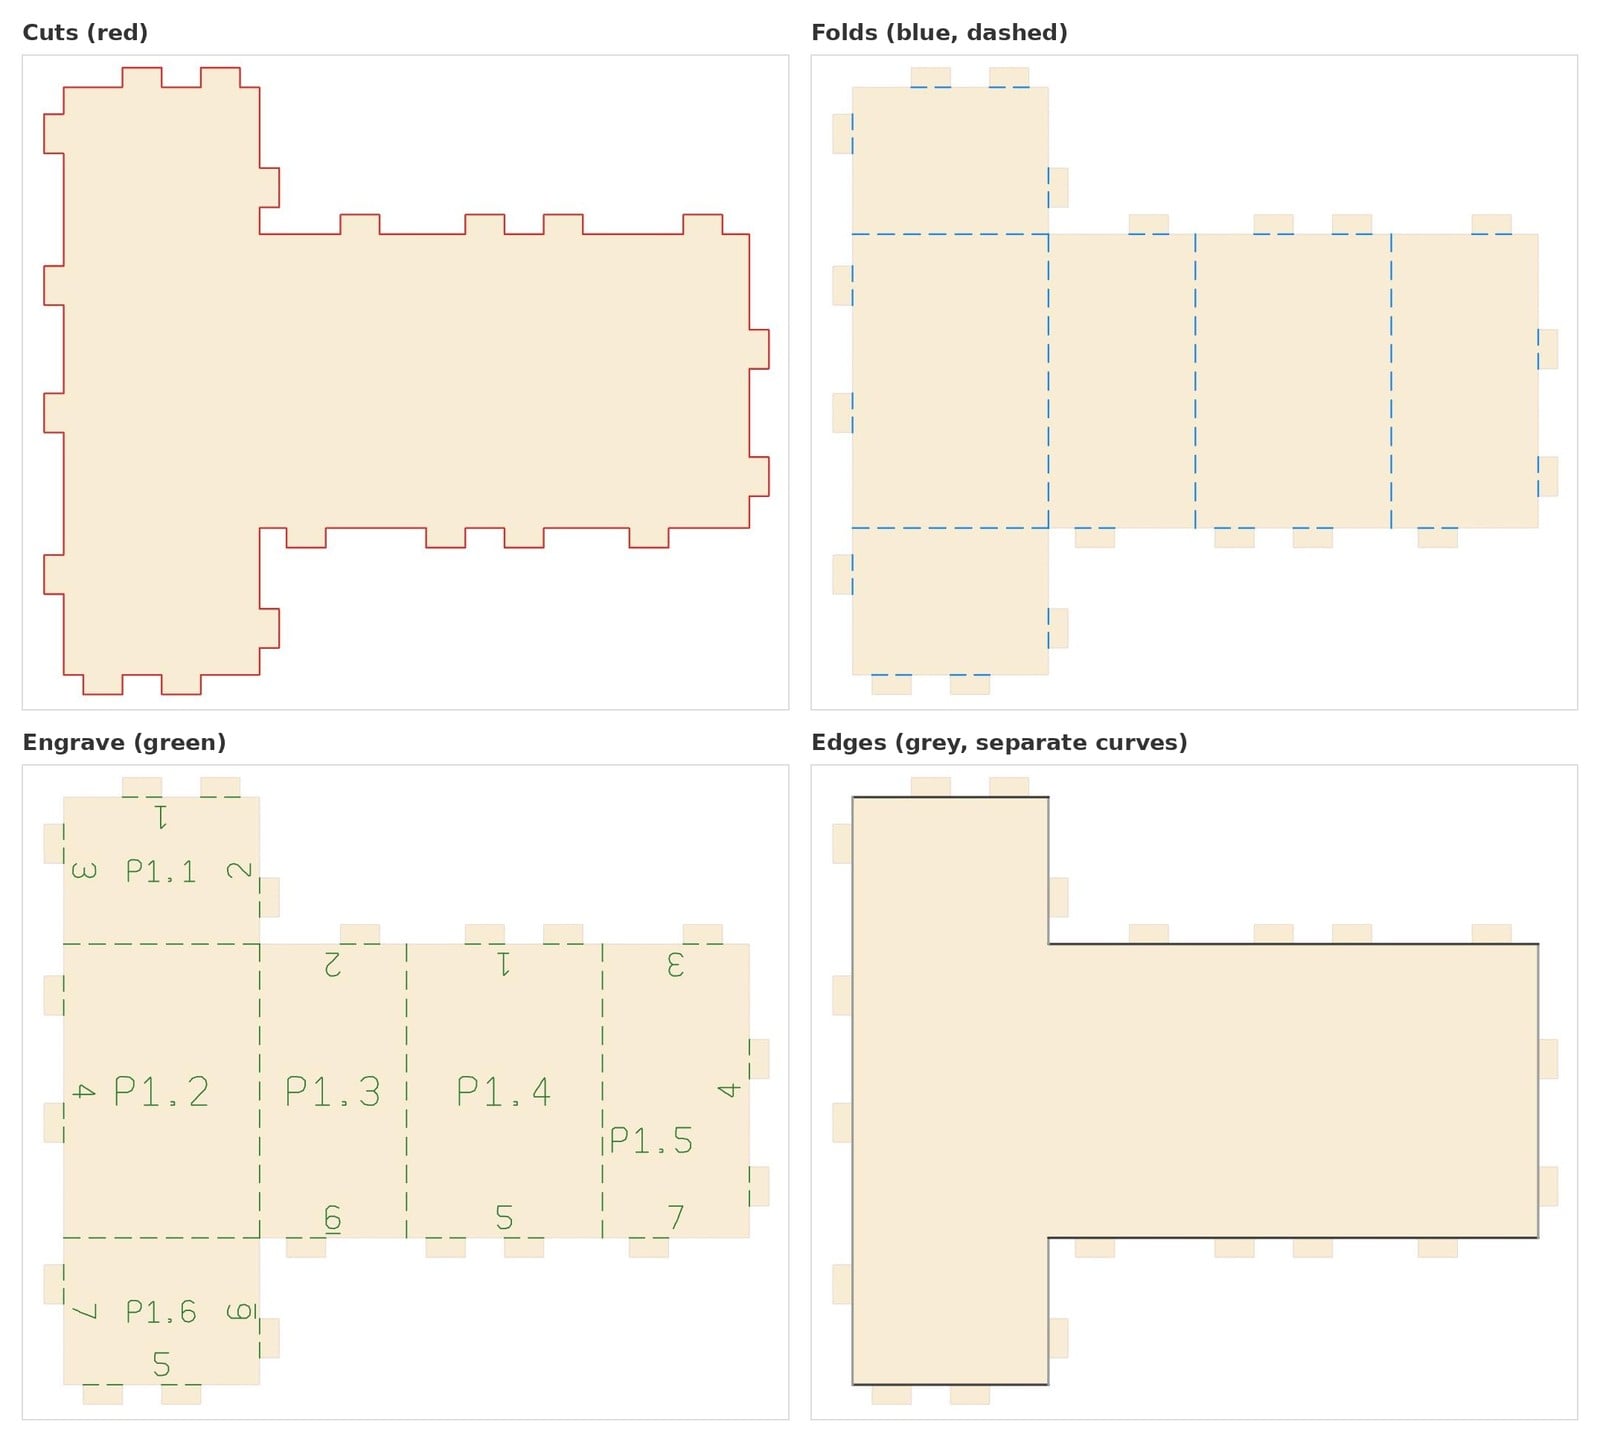
Cuts (red): the outline of every piece, tabs included. These are the lines to cut.
Folds (blue, dashed): the lines to score or fold, including the base of every tab.
Engrave (green): the joint numbers, piece names and fold lines, to engrave or mark.
Edges (grey): each piece outline without tabs, split into separate curves. A strip gives its left, right, start and end edges, so you can pick out its long edges without counting points.
Tabs are made from the curve you wire into Tab Shape, used at its real size:
A closed curve (circle, oval) is centred on the edge, and the half sticking out becomes the tab. A circle of radius 20 gives round tabs 40 wide and 20 high.
An open curve (arc, polyline) sits on the edge from its start point to its end point, and the rest becomes the tab.
Tabs go on every seam, alternating between the two edges that meet so they interleave when the net is folded, and each tab gets a dashed fold line along its base. Tabs keep clear of the corners at both ends of a seam, and on curved strips they go on the long sides only. Use Tab Count to set how many tabs each edge gets. Keep the curve small compared with your pieces: a tab wider than the edge is skipped.
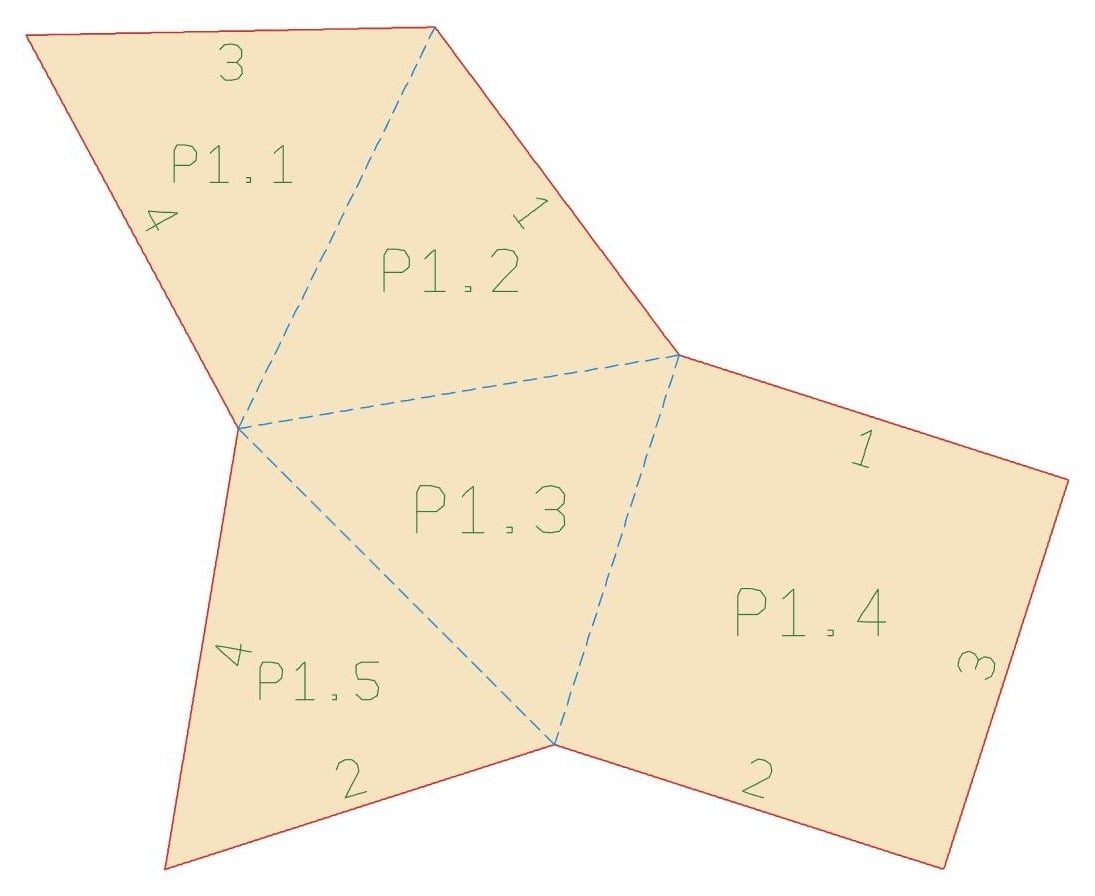
With Mesh Unfold on, the node unfolds the part like a papercraft net: planar faces stay whole, cylinders and cones become strips of flat quads, and the net is grown for the fewest pieces. Folds are blue (mountain) and purple (valley), and Panels sets the segments per full turn of a curved face. Smooth Edges, tabs and Edges don't apply in this mode.
Doubly curved shapes such as a sphere or a torus cannot be flattened into one joined net, because sheet material bends but does not stretch. Unroll Surface cuts them into separate strips (gores), and Join does not keep them together: Join only keeps pieces joined across fold lines, and the seams between gores are cuts.
So don't plan a joined net for these shapes. Instead:
Use Panels to set how many strips you get.
Wire a Tab Shape so every seam gets glue tabs, and match the strips by their joint numbers.
Keep Fold Back Check connected to confirm the strips close into the shape.
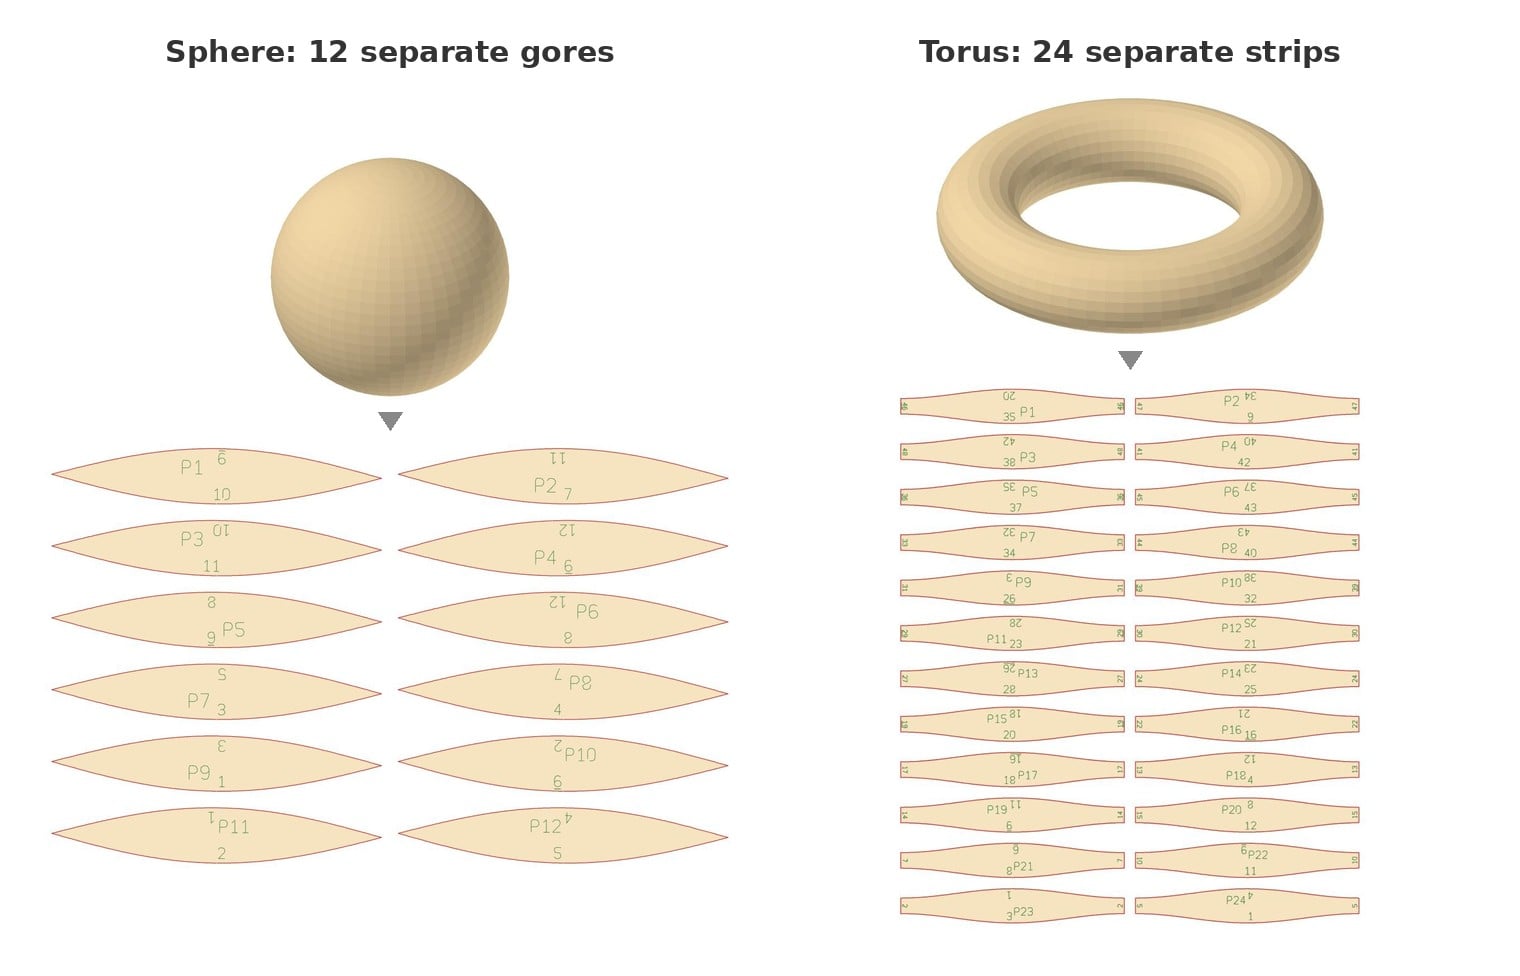
Even with Join on, a sphere comes out as separate gores and a torus as separate strips.
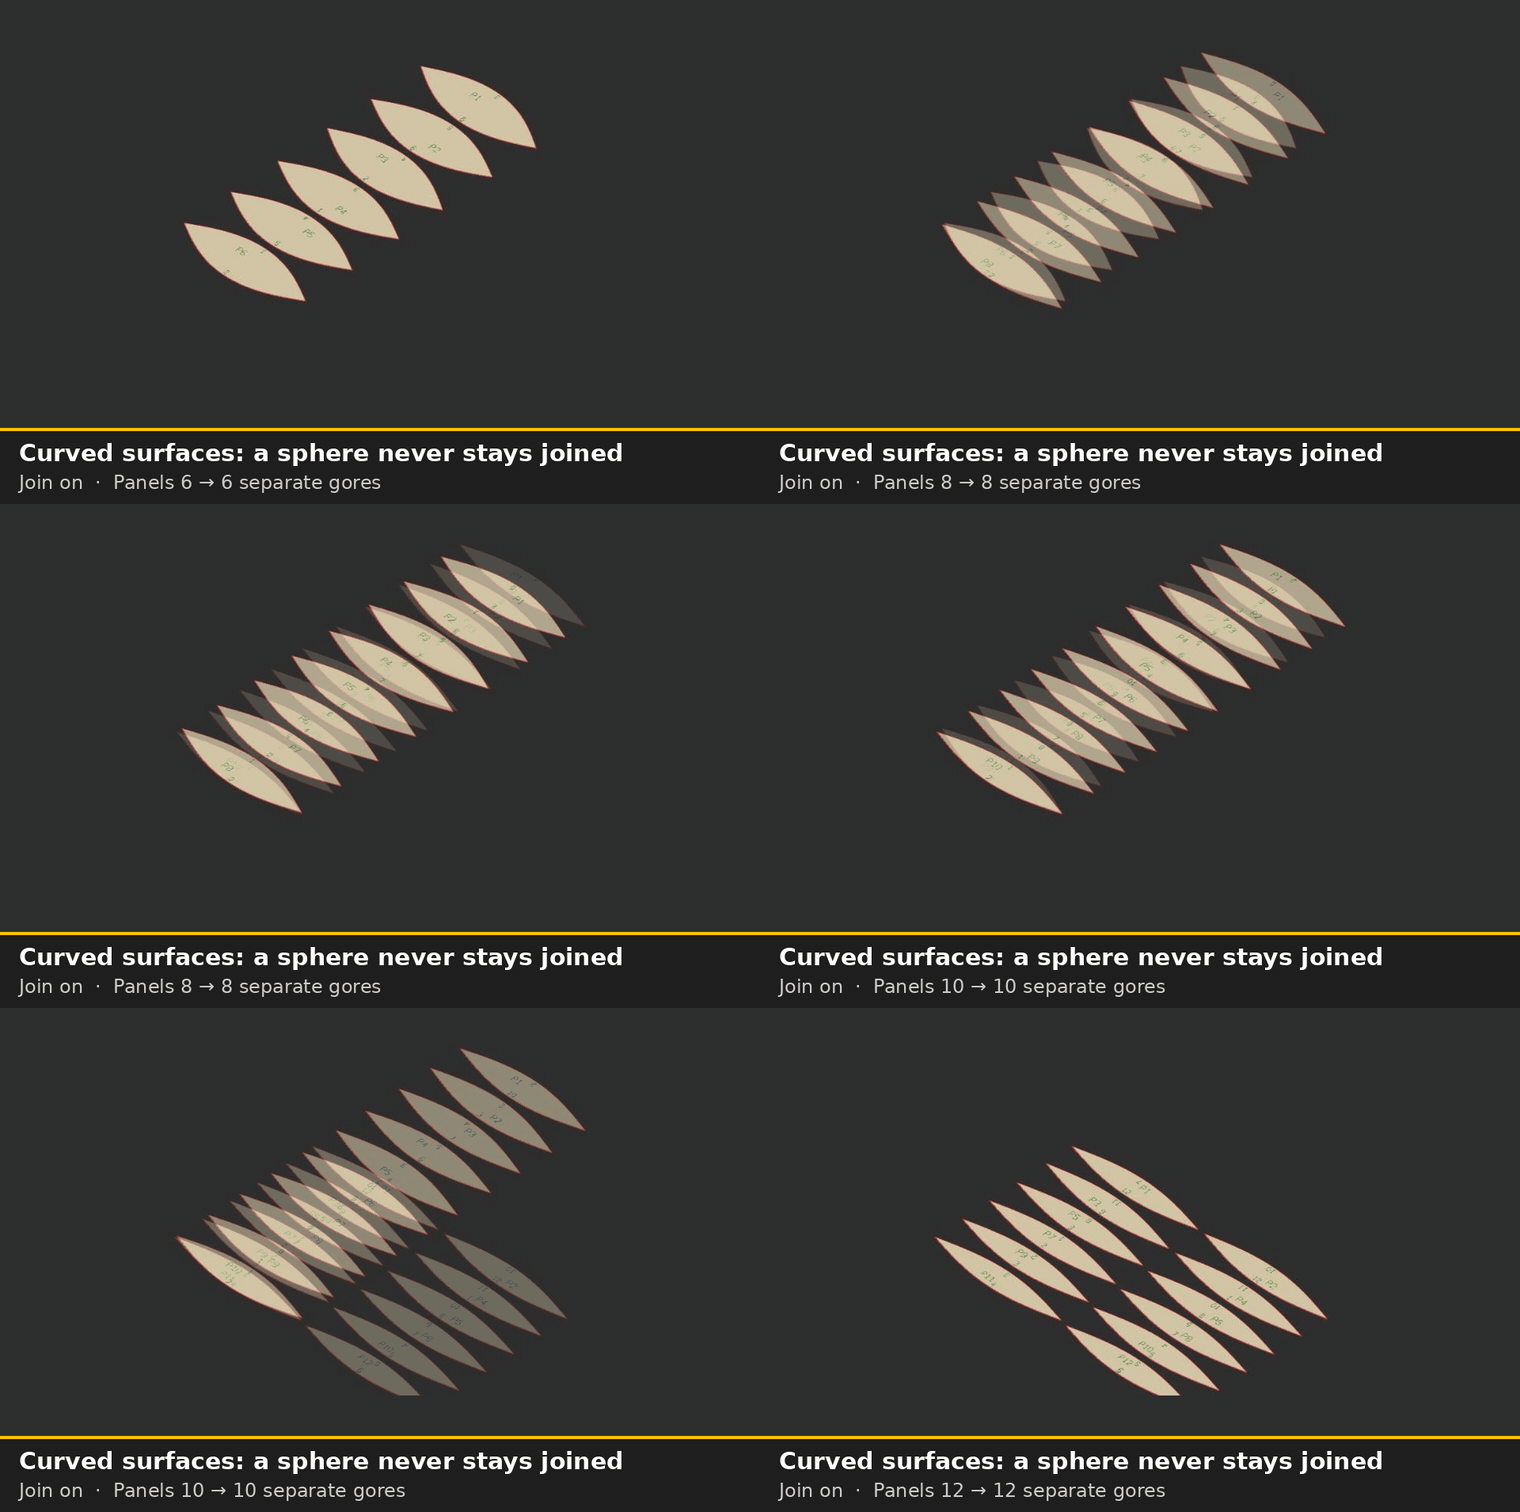
In the viewer: with Join on, raising Panels only cuts the sphere into more gores. They never join into one piece.
The Triangle-Strip Unroll node cuts every curved face into strips of flat triangles that fold facet by facet. It is made for rigid sheet that is scored or V-grooved rather than bent, such as aluminium composite, polycarbonate or plywood, and is commonly used for faceted domes, canopies, cladding, lampshades and low-poly sculpture. Every triangle keeps its true size, flat faces (caps) come out whole, and strips are named A1, A2 … and caps F1, F2 … with matching numbers on every seam.
On a shape with only flat faces, such as a pyramid, every face comes out whole (F1 to F5) with glue tabs on its seams.
Triangle-Strip Unroll has no Join setting: the triangles inside each strip always stay joined, and every strip and flat face is always a separate piece, held together by matching seam numbers and glue tabs (see Join On vs Join Off above).
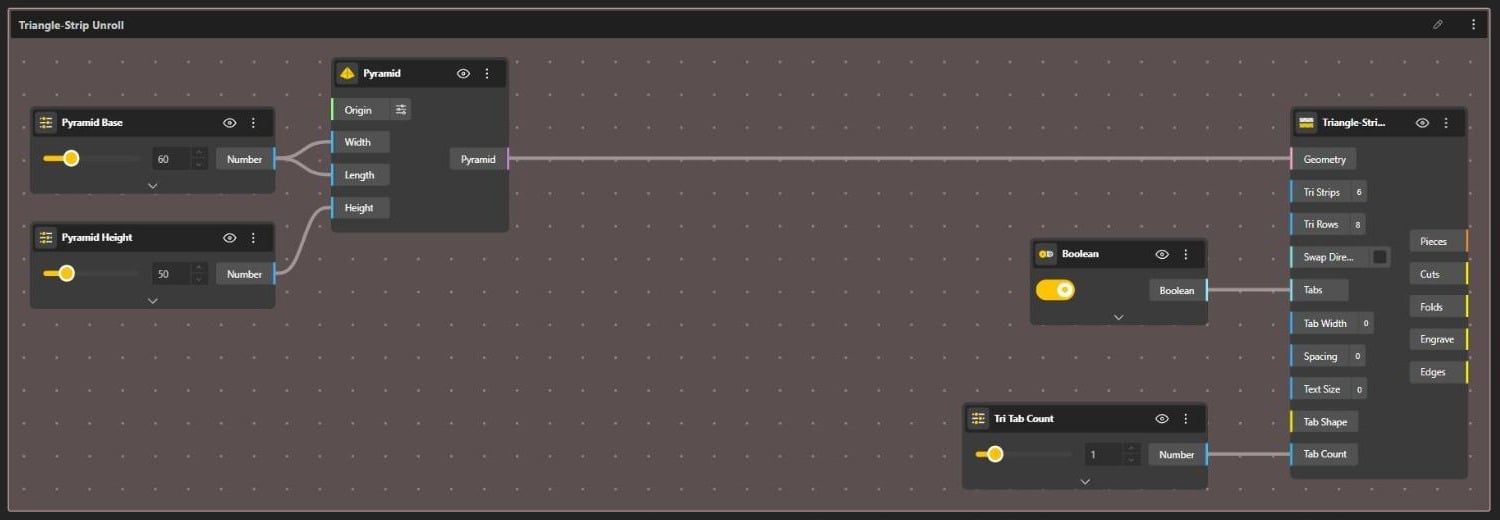
Tri Strips: how many strips each curved face is cut into (1 to 64, default 6).
Tri Rows: how many rows of triangles each strip has (1 to 100, default 8). Fewer rows give fewer, bigger facets.
Swap Direction: turns the strips the other way. By default the rows run along the direction the surface curves most.
Tabs: adds glue tabs on the long sides of the strips, on one side of every seam between strips.
Tab Width: how far the tabs stick out. 0 = automatic (a quarter of the typical strip width).
Spacing: the gap between laid-out pieces. 0 = automatic.
Text Size: height of the strip names; the numbers are 0.7 of it. 0 = automatic.
Tab Shape: wire a curve to replace the default trapezoid tab with your own shape. Tab Width sets its height.
Tab Count: how many tabs each long side of a strip gets, spread evenly. 0 = one per straight stretch.
Pieces: the flat strips and caps.
Cuts (red): the outlines to cut, tabs included.
Folds: mountain folds in blue and valley folds in purple (seen from outside), dashed.
Engrave (green): strip names, seam numbers and fold lines.
Edges (grey): each piece outline without tabs, with left, right, start and end for every strip.
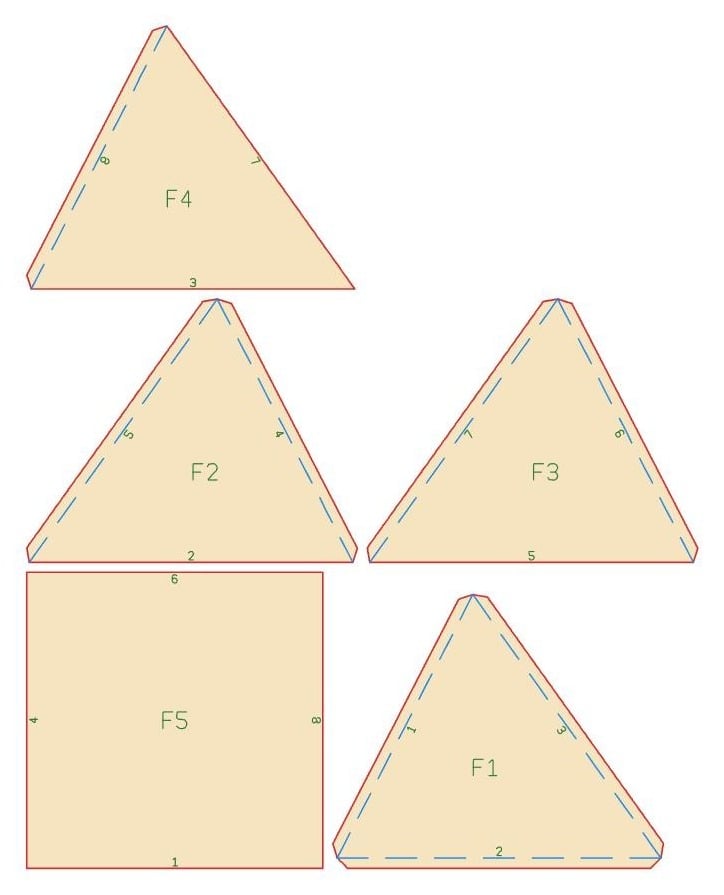
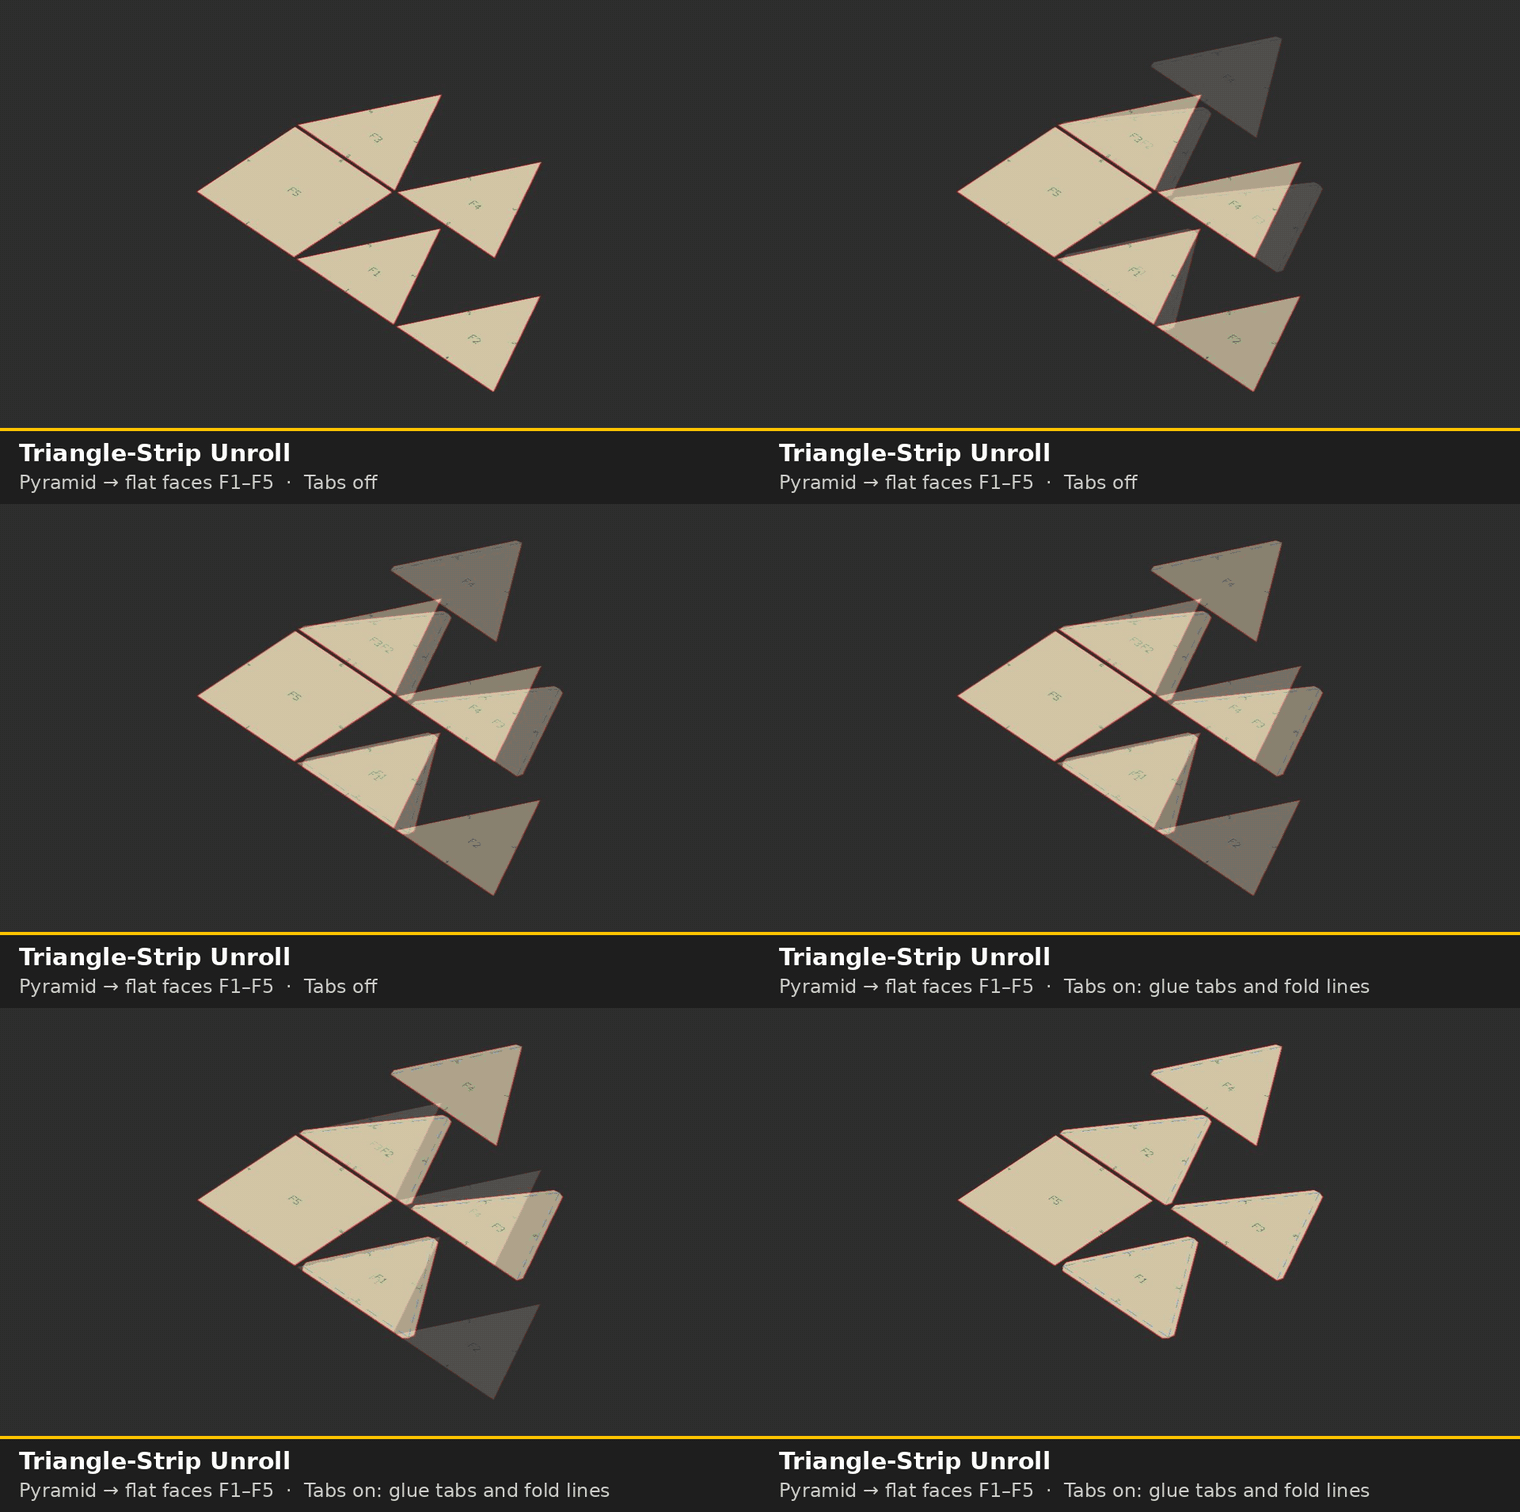
In the viewer: turning Tabs on adds glue tabs and dashed fold lines to the pyramid faces.
The Fold Back Check node folds the flat pieces from Unroll Surface or Triangle-Strip Unroll back into the 3D shape, with every name and joint number carried along. It then tests that every numbered joint meets its partner and that no piece changed size, and reports PASS or CHECK. It is the quickest way to make sure a net is right before you cut it.
To use it, wire the Pieces output of an unroll node into Pieces.
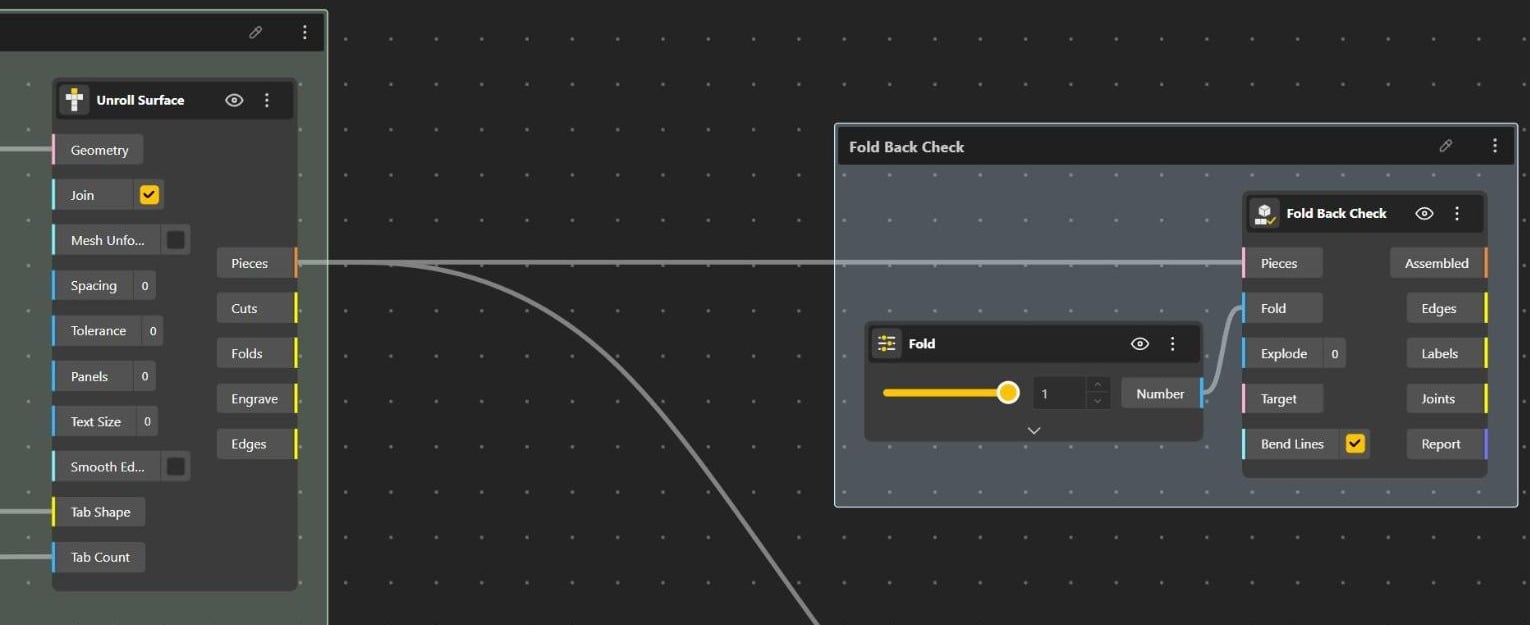
Fold: 0 shows the flat sheet, 1 shows the folded shape. Values in between animate the fold.
Explode: pulls the folded pieces apart from the centre (0 to 2) so you can see each one.
Target: optional. Wire in the original shape to measure how far the folded result lies from it.
Bend Lines: shows the blue lines where the sheet bends between triangles. Turn it off to see only the outlines, which is cleaner on curved strips.
Assembled: the folded pieces, a colour per piece.
Edges: piece outlines in red and, with Bend Lines on, the bends in blue.
Labels: the engraved names and numbers on the folded pieces.
Joints: every joint coloured by result: green = they meet, red = gap or wrong length, orange = the number appears only once, magenta = two pieces touch with no number.
Report: PASS or CHECK, with the joint counts, the largest gap and the size change.
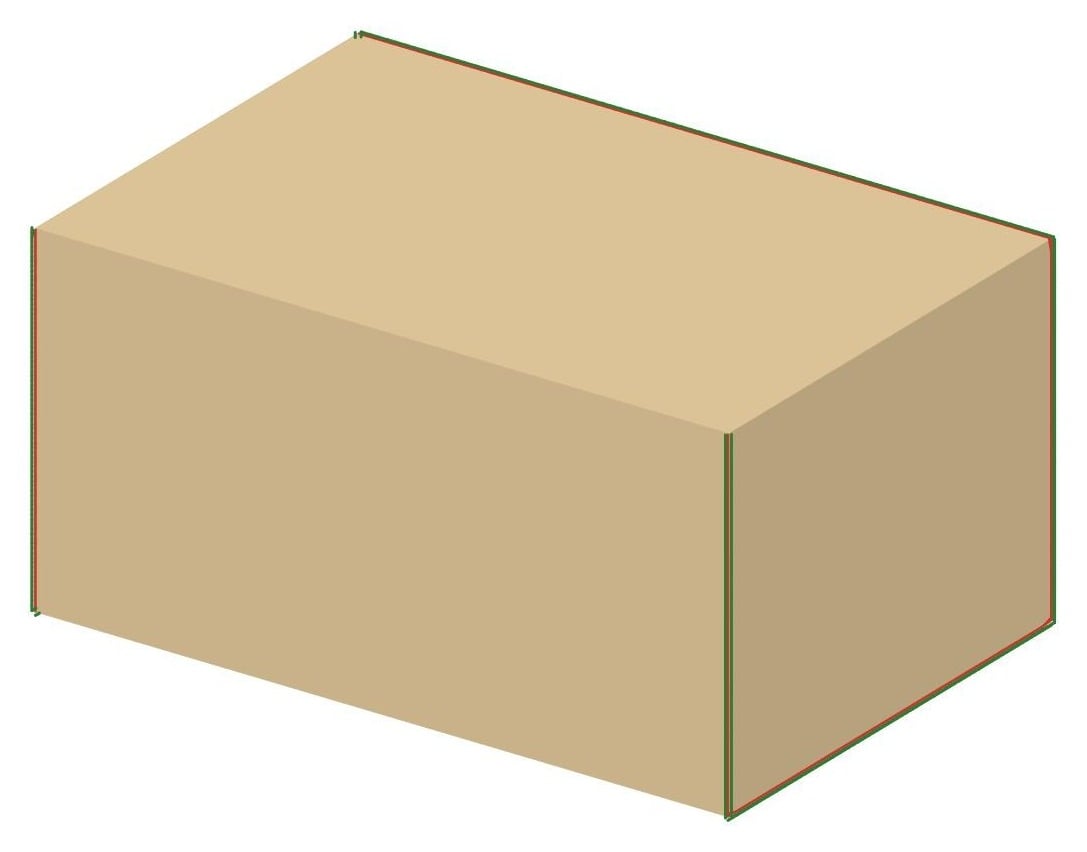
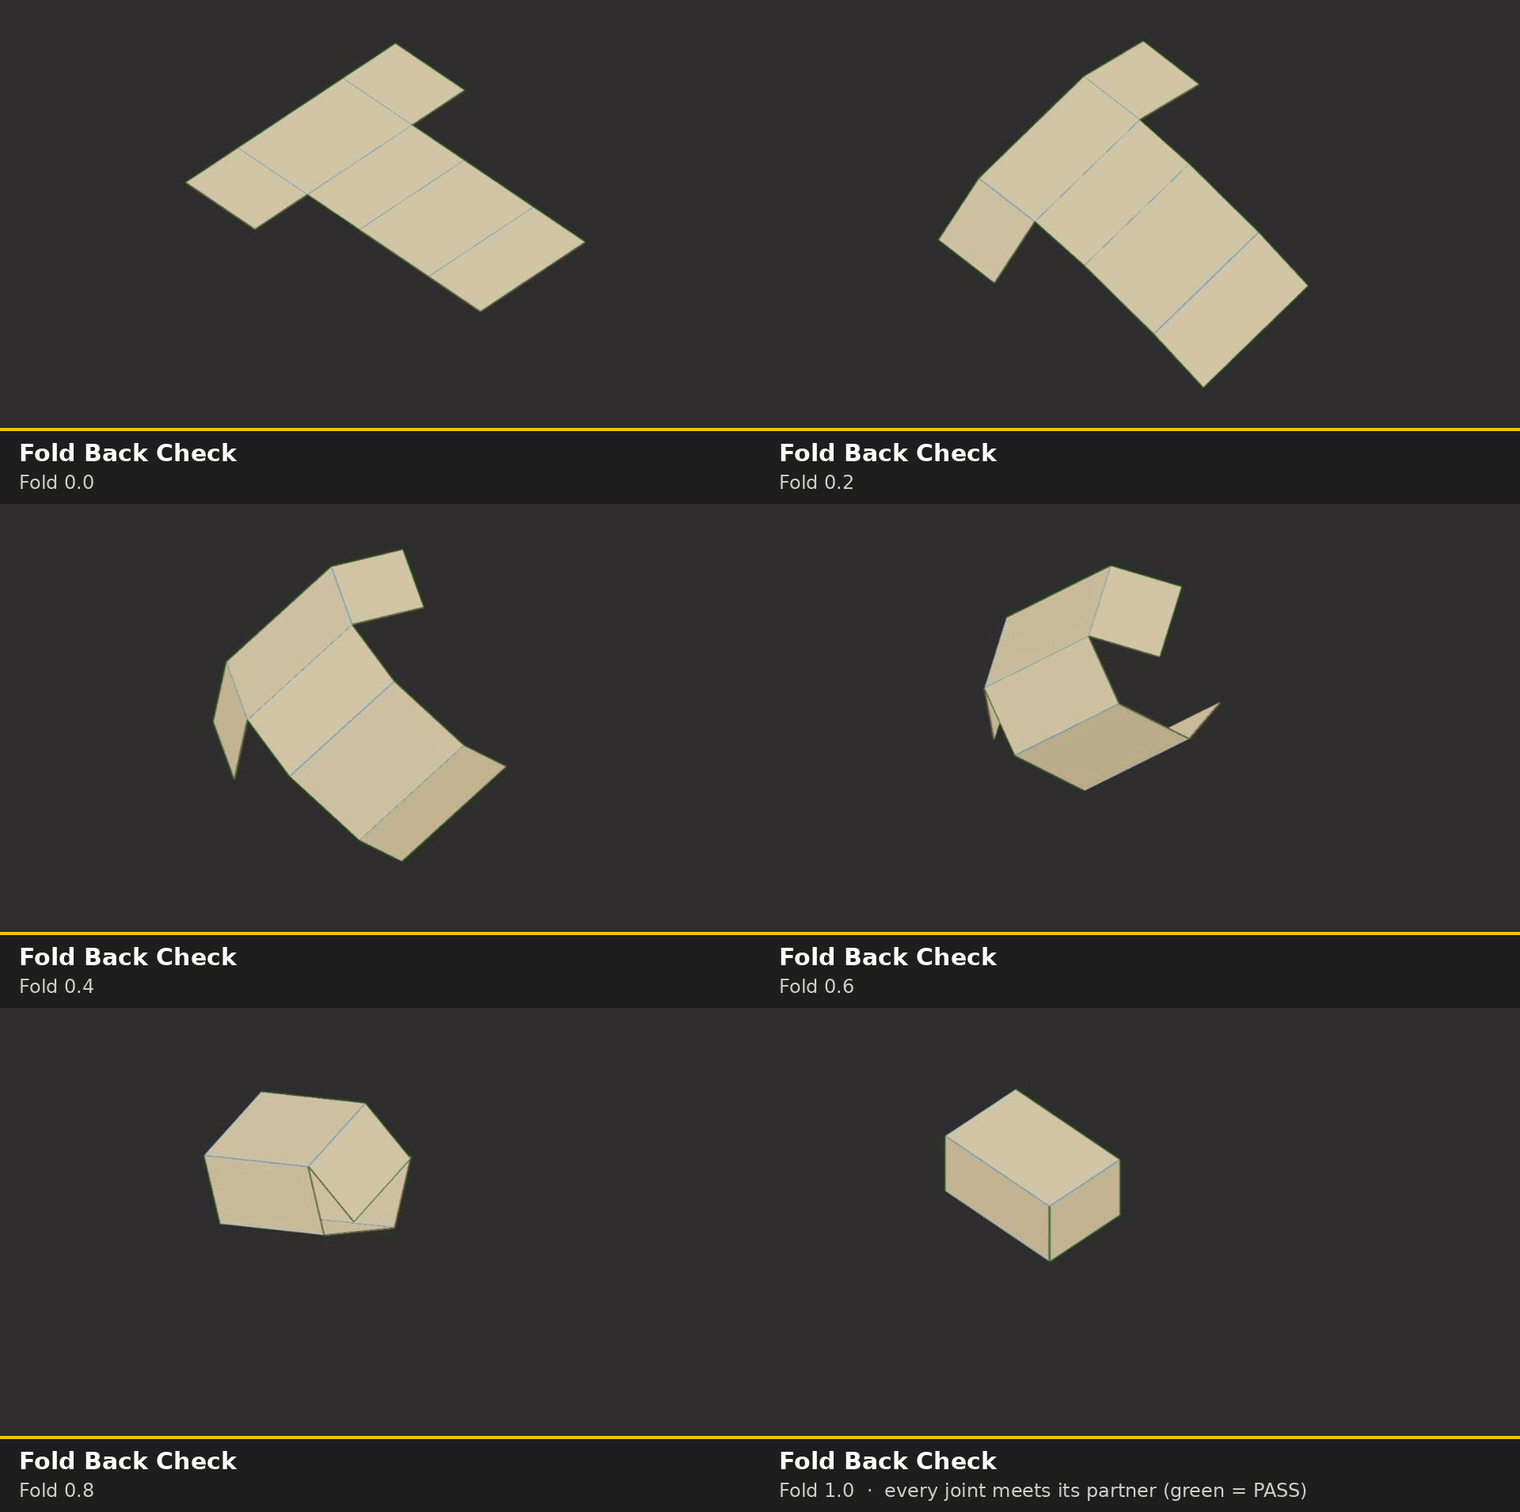
In the viewer: Fold Back Check folding the box net closed. At Fold 1 every joint meets its partner.
The Refold Net node opens a part into a net and folds it closed again with a single slider: 0 shows the flat net, 1 the closed part. Every flat panel turns about the edge it shares with its neighbour, which makes it ideal for previewing how a net folds and for folding animations. It works on any Solid or Surface, and also on the Pieces from either unroll node, which then fold along their own fold lines.
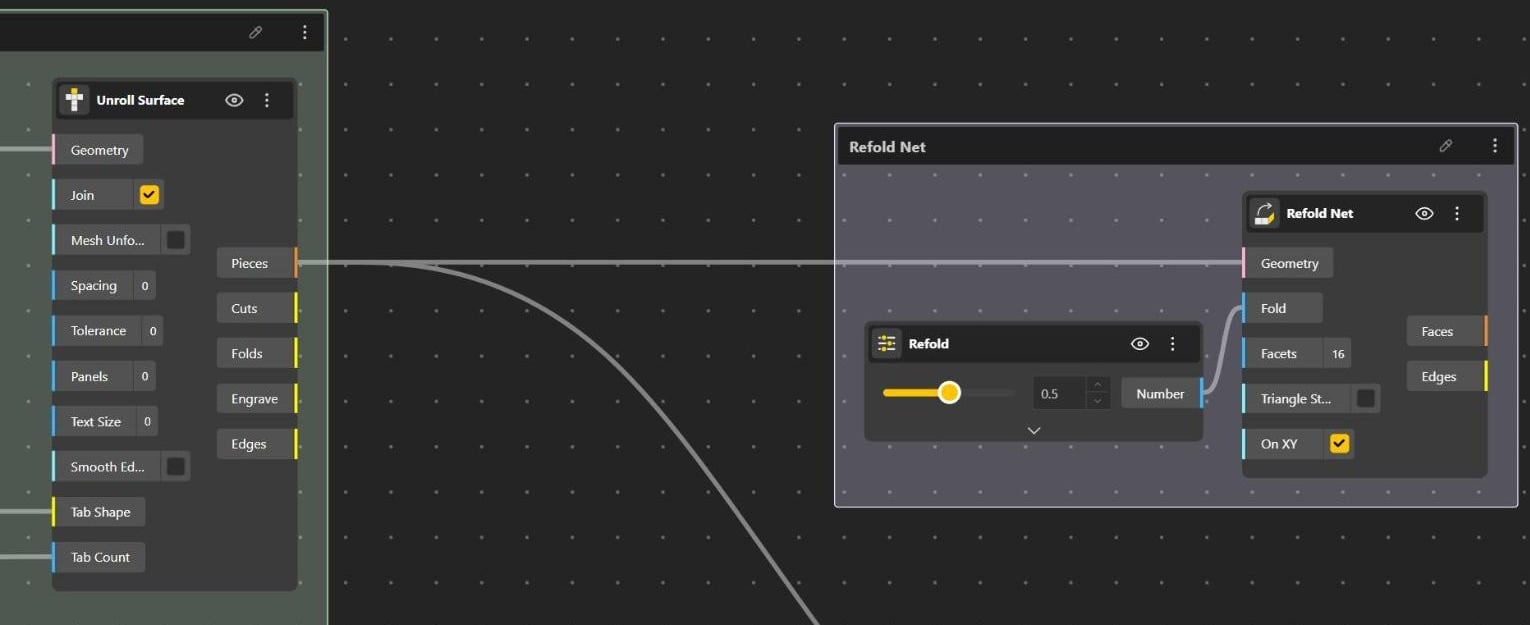
Fold: 0 = flat net, 1 = folded part (default 0.5).
Facets: how many segments a full turn of a curved face is divided into (4 to 64, default 16).
Triangle Strips: for doubly curved faces, off = gores joined along the middle, on = rings joined along one column.
On XY: the net lies flat on the XY plane at Fold 0 and the part stands on it at Fold 1. Off = the largest panel stays where it is in 3D.
Faces: the flat panels at the current fold.
Edges: their outlines.
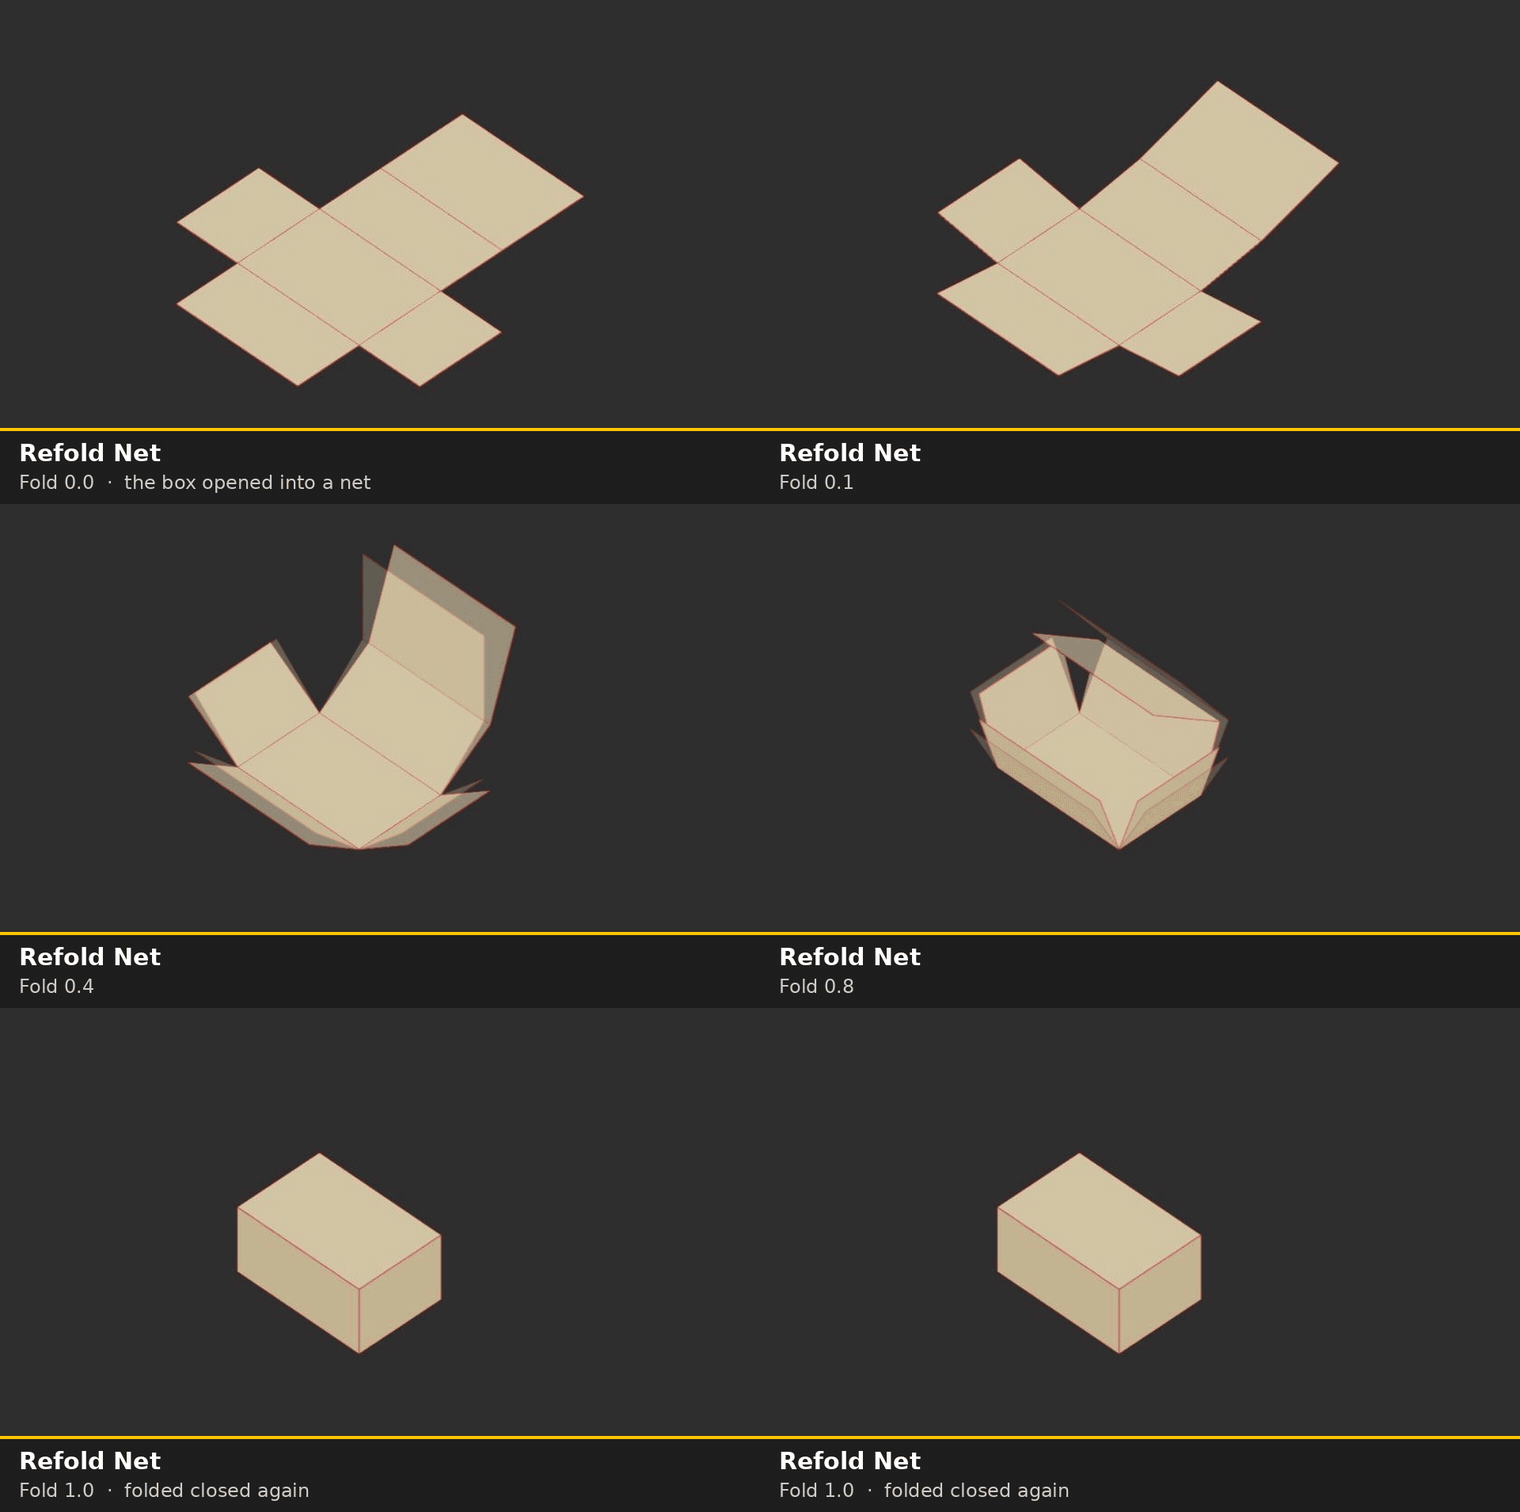
In the viewer: Refold Net with a Box wired into Geometry, folding from the flat net (0) to the closed box (1).
Sending the net to a machine: export Cuts to cut through and Engrave to mark or score; Engrave already includes the fold lines. Don't send Edges: it traces the same lines as Cuts and is only for working with curves inside BeeGraphy.
Limitations:
Doubly curved shapes such as a sphere or torus always come out as separate strips, never as one joined piece, even with Join on, because sheet material cannot stretch.
Curved faces are made of small flat triangles, so the flat area is very slightly smaller than the true surface. More Panels or Smooth Edges brings it closer.
Unroll Surface chooses the strip direction itself; use Triangle-Strip Unroll with Swap Direction when the direction matters.
Tabs are sized in real units, so a tab curve that suits a large lamp is too big for a small part.
Fold Back Check does not show the tabs on the folded shape yet.
Dense curved parts and many tabs can take several seconds to compute.
Tips:
Put Panels, Tab Count and your tab size on Range Inputs so you can tune them with sliders.
Keep Fold Back Check connected while you work: a PASS is the quickest sign the net is right.
If the node is slow while you adjust other settings, unplug Tab Shape for a moment.